Project 4: Run-Length Coding
NC State - Fall ‘25 - CSC 236
Table of Contents
Changelog
Any relevant changes to this page after it’s released will be listed here.
- added hint about debugging with test case input
Due date
This project is due on Monday, November 17th, 2025, 4:30pm ET.
You have a 15-minute buffer for any technical issues, after that you can use your project late days if needed. Please see syllabus for late days policy.
Problem
Overview
Run-lenth coding is a process to compress data without loss. The idea is that you replace any sequence of repeated bytes in your buffer with a single copy and a count to indicate how many times it was repeated.
Let’s run through an encoding example.
Say you have the buffer "aabbbc", after encoding it with rlc, you’d have "a2b3c1".
To decode an rlc-encoded string, you simply repeat each value the number of times after it.
For example, say you have "a1b2c3d4", after decoding it with rlc, you’d have "abbcccdddd".
For this project, you will implement RLC encoding and decoding.
Additionally, you will use base36 as the possible number of repetitions.
Base36 uses digits 0 through 9 first, and then lowercase letters a through z for a total of 36 values.
For example, if you want to encode a string that contains 11 As and 12 !s, the result encoding would be "Ab!c".
If a character appears more than 35 times in a row, you would encode it in multiple parts.
For example, if there are 40 as in a sequence in the input, your output would include aza5 to encode that part.
In this case, az indicates 35 as and a5 the remaining 5 as.
Details
You will create a file called rlc.S.
In this file, you will create two subroutines _encode and _decode.
These subroutine should follow the C calling convention, i.e., parameters are in reverse order in the stack, and any return value should be in x0.
Important: your subroutines must preserve:
- the values inside the input buffer
- all non-volatile registers
- the stack and frame pointers
_encode
Your _encode subroutine will receive two parameters, (i) the address of a null-terminated input string buffer and (ii) the address of the output string buffer.
It should encode the input buffer into an RLC buffer using base36 as the number of repetitions.
Lastly, it should return the number of bytes you wrote to the output buffer.
_decode
Your _decode subroutine will receive two parameters, (i) the address of a null-terminated, rlc-encoded, input string buffer and (ii) the address of the output string buffer.
It should decode the input buffer from an RLC buffer into an expanded string.
Lastly, it should return the number of bytes you wrote to the output buffer.
Implementation notes
Note that:
- you do not need to add null characters to the output buffer, you can simply stop processing the input when you encounter a null character;
- for the return value, you should not count any null characters you added to the output buffer.
Example I/O
The standard input will start with E to indicate encoding or D to indicate decoding.
Then, it will contain up to 512 bytes of data to be encoded or decoded.
Note that you don’t need to parse STDIN, check sample workspace.
- Decoding message without repetitions
- Message to decode:
a1A1b1B1c1C1 - STDIN:
Da1A1b1B1c1C1 - Expected output buffer:
aAbBcC - Expected
_decodereturn:6
- Decoding message with repetitions in range
[1, 9]
- Message to decode:
a1A2b3B4c5C6 - STDIN:
Da1A2b3B4c5C6 - Expected output buffer:
aAAbbbBBBBcccccCCCCCC - Expected
_decodereturn:21
- Decoding message with repetitions in range
[1, 35]
- Message to decode:
aaA2b1Bbc2C4 - STDIN:
DaaA2b1Bbc2C4 - Expected output buffer:
aaaaaaaaaaAAbBBBBBBBBBBBccCCCC - Expected
_decodereturn:30
- Decoding message with more than 35 repetitions
- Message to decode:
aza5bzb5 - STDIN:
Daza5bzb5 - Expected output buffer:
aaaaaaaaaaaaaaaaaaaaaaaaaaaaaaaaaaaaaaaabbbbbbbbbbbbbbbbbbbbbbbbbbbbbbbbbbbbbbbb - Expected
_decodereturn:80
- Encoding message without repetitions
- Message to encode:
aAbBcC - STDIN:
EaAbBcC - Expected output buffer:
a1A1b1B1c1C1 - Expected
_encodereturn:12
- Encoding message with repetitions in range
[1, 9]
- Message to encode:
aAAbbbBBBBcccccCCCCCC - STDIN:
EaAAbbbBBBBcccccCCCCCC - Expected output buffer:
a1A2b3B4c5C6 - Expected
_encodereturn:12
- Encoding message with repetitions in range
[1, 35]
- Message to encode:
aaaaaaaaaaAAbBBBBBBBBBBBccCCCC - STDIN:
EaaaaaaaaaaAAbBBBBBBBBBBBccCCCC - Expected output buffer:
aaA2b1Bbc2C4 - Expected
_encodereturn:12
- Encoding message with more than 35 repetitions
- Message to encode:
aaaaaaaaaaaaaaaaaaaaaaaaaaaaaaaaaaaaaaaabbbbbbbbbbbbbbbbbbbbbbbbbbbbbbbbbbbbbbbb - STDIN:
Eaaaaaaaaaaaaaaaaaaaaaaaaaaaaaaaaaaaaaaaabbbbbbbbbbbbbbbbbbbbbbbbbbbbbbbbbbbbbbbb - Expected output buffer:
aza5bzb5 - Expected
_encodereturn:8
Sample Workspace
You only need to implement the _encode and _decode subroutines.
You do *not* need to create a _start label, nor use read/write syscalls.
We have created a driver program that will do those for you.
You can either download only the driver (click here) or a webassembliss workspace, which includes the driver and skeleton for the rlc.S file (click here).
Both options should allow you to complete the project.
When you submit your code for grading, you will only select the rlc.S file, as the project config will include a copy of the driver available above.
Important: You can upload the workspace by clicking on the dropdown next to Upload on webassembliss. Note that this *will delete* any code/files you currently have open in your editor, like the pop-up message will warn you.
Project Grading
Your code will be graded on documentation (20%) and accuracy (80%).
Documentation
The documentation score is calculated based on the ratio of comments and lines of code in your file. It is calculated in two equally-weighted parts:
(1) ratio of comment-only lines to all instruction lines
Say x is the ratio of your comment-only lines to all the instruction lines you have.
The grade for this section follows the table below:
| Cutoff | Score |
|---|---|
| x >= 40% | 100% |
| x >= 35% | 75% |
| x >= 30% | 50% |
| x < 30% | 0% |
(2) ratio of instructions with inline-comments to all instructions
Say y is the ratio of your instruction lines that have inline comments to all the instruction lines you have.
The grade for this section follows the table below:
| Cutoff | Score |
|---|---|
| y >= 80% | 100% |
| y >= 70% | 75% |
| y >= 60% | 50% |
| y < 60% | 0% |
Accuracy
Your code will be tested with multiple test cases. Each test case for this project is worth 1 point each, so they’re all equally weighted. All test cases for this project are open, so you should be able to see which ones you passed and which ones you failed when grading your code. If you fail any test cases, you can copy its input and run your code in the editor to debug it.
Submission
Grading your code
You will use webassembliss to grade your code:
On the grader page, you will enter your full name and UnityID, and upload your rlc.S solution and the rlc.pb2 project configuration file.
Click here to download the project configuration file.
Important: make sure your file is called rlc.S!
After filling in the page and clicking on submit, the page should take you to the grader results.
It might take a minute or so for your submission to be graded if there’s many people submitting, please do *not* refresh right away. If you get a timeout grading your code on the public instance (web.assembliss.app), try using the NCSU-restricted one as that one allows for a longer wait time for the request.
The grader results page shows you the total score your solution received, and has a button at the top that says Download file for submission.
This button should let you download a file called Run-LengthCoding_UnityID_results.json.
Here’s an example of the top of the grader results page:
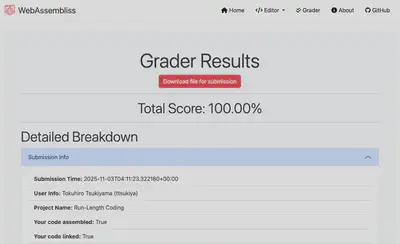
The Run-LengthCoding_UnityID_results.json file contains your name, ID, source code, all information about the tests you passed, and your overall score.
This is the file you will submit to Moodle.
If you scroll down on the grader results, it will also show you which tests you passed, with diffs for all of them. You can also see the documentation score you received.
You can resubmit your updated code as many times as you wish to the server, so you’re able to fix any bugs you have compared to the expected test cases.
Whenever you’re satisfied with the grade you received, you can submit the appropriate json file to Moodle.
There are no efficienty targets for this project, you’re fine to ignore the Source Efficiency and Execution Efficiency sections of the results.
Submitting to Moodle
You will submit your Run-LengthCoding_UnityID_results.json to Moodle.
The last json file you upload to Moodle will be the one considered for grading, and the timestamp of the last moodle submission will be considered the time you submitted your code for early/late submission policies.
Only files submitted through Moodle will be graded. The teaching staff will not accept submissions received through other channels (email, EdStem, etc.).
The teaching staff will only grade this project after no more submissions can be made (i.e., after the late submission window is closed).
Getting help
Please use EdStem and office hours! For EdStem, make sure to set your posts to private if you’re sharing code. We also have a planned project workday before this project is due, check the course schedule.
Hints
Input shown on grader
When running the grader, if you see \n or \" in the input/output, that means a python-escaped character; \n means a line break, and \" means a double quote.
If you’re using that input to debug, make sure you replace these charactes in the input box of the editor.
Example: the input A1\n2\"3C4D5\"6 should become:
A1
2"3C4D5"6
Input buffer
It is safe to assume the input buffer will have at least a few null characters after the last non-null character.
Output buffer
You can assume the outbut buffer given to you is large enough to store the decoded/encoded result string and that it’s completely filled with null characters when your subroutine starts.
Finding out length of output buffer
You can keep track of how many bytes you’ve written to the output buffer. However, you can also find out this number after you’re done writing to the buffer by calculating the difference between the address of the start of the buffer and the last address you wrote to.
Order of implementation
The test cases are setup to give you points as you make progress towards your final solution. We suggest you implement your code either in:
(i) the same order we showed the sample i/o:
- decoding without repetitions
- decoding with
[1, 9]repetitions - decoding with
[1, 35]repetitions - decoding with
35+repetitions - encoding without repetitions
- encoding with
[1, 9]repetitions - encoding with
[1, 35]repetitions - encoding with
35+repetitions
or (ii) increasing the number of repetitions you can handle:
- decoding without repetitions
- encoding without repetitions
- decoding with
[1, 9]repetitions - encoding with
[1, 9]repetitions - decoding with
[1, 35]repetitions - encoding with
[1, 35]repetitions - decoding with
35+repetitions - encoding with
35+repetitions
Break your code into pieces
It could be helpful to have small helper subroutines for specific tasks.
If you do take this route, make sure to pay attention to the link register (i.e., lr, x30) so you can ret to the correct spot.